The Complete C9 LED Christmas Light Installation Guide
C9 Christmas lights are the gold standard of outdoor holiday displays. Their large, bold bulbs catch light from a distance, define the architecture of your home, and make even a modest roofline look professionally decorated. Whether you're lighting up your first house or upgrading from an old incandescent string, this guide walks you through every step — from counting bulbs to plugging in for the first time.
This is the definitive guide to installing C9 LED Christmas light bulbs. It covers bulb types, wiring, electrical planning, installation on every major surface, weatherproofing, and storage. If your C9 Christmas lights project focuses specifically on roofline and eave installation, we have a detailed deep-dive for that: How to Install Christmas Lights on Your Roof (Socket Wire Method).
What Are C9 LED Christmas Light Bulbs?
Before you buy a single bulb, it helps to know exactly what you're working with. The C9 designation refers to the bulb's shape and size — a large, rounded egg or teardrop shape that is immediately recognizable from the street. The number corresponds to the diameter in eighths of an inch, so a C9 is 9/8" (just over an inch) across at its widest point.
Every C9 bulb uses an E17 base, also called an intermediate base. This is the standard socket size for all C9 stringers and wire — if a product is labeled E17, it's compatible with your C9 setup.
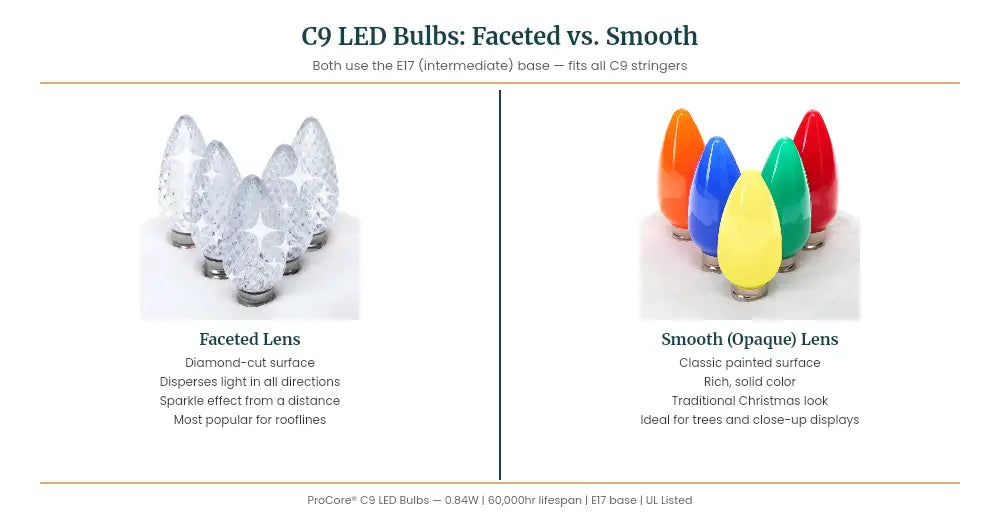
C9 LED Bulbs — Faceted vs. Smooth: Both use the E17 base. ProCore® specs: 0.84W per bulb, 60,000hr lifespan, polycarbonate lens, nickel-plated base, UL Listed. Faceted: diamond-cut surface, disperses light in all directions, sparkle effect from a distance, most popular for rooflines. Smooth (Opaque): classic painted surface, rich solid color, ideal for trees and close-up displays.
ProCore® LED Bulbs: The Core of Your Display
The C9 ProCore® LED bulb is built around SMD LED technology and draws just 0.84 watts per bulb — a fraction of what old incandescent C9s consumed. The lens is made of polycarbonate, which is virtually unbreakable and holds its color permanently — it won't fade, chip, or crack season after season. The base is nickel-plated to prevent corrosion, and the entire bulb is cool to the touch during operation. ProCore® bulbs are UL Listed and backed by the Reindeer Proof™ Warranty.
ProCore® C9 bulbs come with a rated lifespan of up to 60,000 hours — meaning if you run them 8 hours a night, they're built to last well beyond a human lifetime of holiday seasons.
Faceted vs. Smooth: Choosing Your Lens Style
ProCore® C9 bulbs are available in two lens styles, each producing a distinct visual effect:
The Faceted lens features a diamond-cut surface that breaks and disperses light in all directions. From a distance, a faceted C9 appears to sparkle and shimmer, casting a wide glow that reads beautifully from across the street. This is the most popular choice for roofline outlines.
The Smooth (Opaque) lens has a classic painted surface, similar to the look of a traditional Christmas bulb. Colors are rich and solid, making them ideal for a clean, vintage-inspired display or when you want bold color without the sparkle effect.
Motion: Steady, Twinkle, Strobe, and RGB
Steady ProCore® bulbs burn at a constant brightness and are fully dimmable when paired with a compatible dimmer. This makes them the most versatile choice for most installations.
Twinkle ProCore® bulbs flicker gently like candlelight for a soft, organic movement. Note: Twinkle bulbs may not be dimmable or may display undesirable behavior when used with a dimmer — they are best run on a standard non-dimming circuit or timer.
SuperSpark® C9 Strobe bulbs take things up a notch. Each bulb strobes independently at random intervals, creating a dramatic, high-energy flash effect across your display. SuperSpark® bulbs draw 2.25 watts per bulb at peak output — always use the 2.25W figure when calculating your circuit load. SuperSpark® strobes are available in Blue, Red, and Green and are NOT compatible with standard dimmers or controllers.
C9 RGB Color Changing ProCore® bulbs auto-cycle through seven colors: yellow, teal, cool white, pink, purple, green, and red. They draw 0.84 watts per bulb but are non-dimmable. RGB bulbs add a dynamic, multicolor effect without any controllers or smart-home setup required.
Complete Shopping List
Here's everything you need for a complete C9 LED installation. Use this as your pre-season checklist.
| Item | Why You Need It | Where to Get It |
|---|---|---|
| C9 ProCore® LED Bulbs | The light source — choose steady, twinkle, strobe, or RGB | C9 LED Bulb Collection |
| C9 Stringer — 100' | Pre-made wire with 100 sockets at 12" spacing, ready to use | 100' Stringer |
| C9 Stringer — 25' | Shorter runs, window outlines, fill gaps | 25' Stringer |
| Vampire Plug — Male | Power inlet end of a custom wire run — press-on, no tools needed | Male Vampire Plugs |
| Vampire Plug — Female | Output end of a run or to link runs together | Female Vampire Plugs |
| C9 Socket Seals (O-Rings) | Weatherproof barrier between bulb base and socket — essential outdoors | Green / White |
| Shingle Speed Tab Clips | Fastest clip for asphalt shingle, wood, metal, or slate tile roofs | Shingle Speed Tabs |
| Christmas Light Clips | Surface-specific clips for gutters, fascia, and more | All Clips |
| Timer | Automate on/off — saves energy and extends bulb life | Timers |
| Replacement Sockets | Repair damaged sockets on existing wire runs | Replacement Sockets |
| SPT Wire | Build custom-length runs with exact spacing | SPT Wire |

Pre-Made Stringer vs. Custom Socket Wire: Pre-Made Stringer — ready to use out of the box; fixed lengths of 25 ft or 100 ft; best for most homes; cannot be cut to a custom size; male plug only, no daisy-chaining. Custom Socket Wire — cut to any exact length; any socket spacing; best for pros and large installs; full routing and layout control; add power taps anywhere on the run.
How Do You Plan a C9 Christmas Light Display?
Good planning before you buy saves time, money, and multiple trips up the ladder. Start by measuring every surface you plan to light.
Measuring and Calculating Bulb Count
Walk the perimeter of your home with a tape measure or a measuring wheel. Measure each roofline run, window frame, door surround, and any trees or railings you plan to outline. Add 10% to each measurement for corners, overhangs, and minor miscalculations.
Once you have your total linear footage, divide by your bulb spacing to get your bulb count. Standard C9 stringers use 12" (one foot) spacing — the classic commercial look. At 12" spacing, 100 linear feet = 100 bulbs. That math makes it easy.
The quick formula: 1 C9 bulb per linear foot at 12" spacing. Measure your total run length in feet — that number is your bulb count. Add 10% for corners and miscalculations and you have your order quantity.
Spacing Options
If you're building a custom wire run using SPT wire and adding your own sockets, you can choose any spacing you like. Tighter spacing (6" or 9") creates a denser, more dramatic look. Wider spacing (18" or 24") is often used on large commercial properties or for a more subtle accent effect. For most residential rooflines and window outlines, 12" spacing is the right call — it's the industry standard for a reason.
Color Planning
Write out your color map before ordering. Decide which zones get which colors, whether you're mixing steady and twinkle in the same run, and whether you want SuperSpark® strobes placed at regular intervals for drama. Having a plan on paper prevents mismatched orders and keeps your display balanced.
Circuit Mapping
Identify which outdoor outlets you'll plug into and which circuit breakers they're on. Most homes have 15-amp outdoor circuits. Note any other devices that may share those circuits (porch lights, security cameras, holiday inflatables) — their load counts against your available capacity.
Electrical Planning
This is the most important section in this guide for any C9 Christmas lights installation. Getting the electrical math right protects your home and your investment. There are three separate limits you must respect — your circuit breaker capacity, your wire's current rating, and voltage drop over the length of each run. The circuit breaker alone does not protect you from all three.
The 80% Continuous Load Rule (Circuit Breaker Limit)
The National Electrical Code (NEC) requires that continuous loads — any load expected to run for 3 hours or more — not exceed 80% of the circuit's rated capacity. Christmas lights run for hours every night, so they qualify as a continuous load. Always design to the 80% limit, not the circuit's full amperage.
A 15-amp circuit at 120V has a maximum continuous load of 1,440 watts (15A × 120V × 0.80).
A 20-amp circuit at 120V has a maximum continuous load of 1,920 watts (20A × 120V × 0.80).
With ProCore® C9 LED bulbs at 0.84W per bulb, the circuit breaker math alone would suggest up to ~1,714 bulbs on a 15-amp circuit. Do not use that number to plan a single wire run. Your wire has its own current limit that is much lower, and voltage drop will degrade light performance long before you reach circuit capacity. Read the next two sections before sizing any run.
Wire Current Limit: SPT1 and SPT2 Ampacity
The 18 AWG wire used in C9 stringers and SPT socket spools has a maximum current rating independent of your circuit breaker. SPT1 (18 AWG) is rated for approximately 7–10 amps continuous. SPT2 uses the same 18 AWG copper conductor and carries the same current rating — the thicker insulation provides better UV and cold-weather protection, but does not increase ampacity.
At 0.84W per ProCore® C9 LED bulb and 120V, each bulb draws approximately 0.007 amps (0.84W ÷ 120V). That sounds small, but it adds up across a long run:
- 100 bulbs at 0.007A each = 0.7A total — well within SPT1 limits
- 500 bulbs = 3.5A total — still within limits
- 1,000 bulbs = 7A total — at or near the SPT1 rated limit
- 1,400+ bulbs = approaching or exceeding SPT1 ampacity — do not do this on a single continuous run of wire
In practice, a single continuous C9 wire run should be planned well under 1,000 bulbs, and large displays should be split into multiple shorter runs, each with its own power source. Never daisy-chain runs to the point where the total current through any section of wire exceeds 7 amps.
Voltage Drop Over Distance
Even if your current load is within the wire's ampacity rating, a long run will suffer voltage drop — the wire's resistance causes the voltage at the far end to be lower than at the plug. With LEDs, this typically shows up as dimmer or slightly off-color bulbs toward the end of a long run. In severe cases, bulbs may flicker or not light at all.
For 18 AWG copper wire (SPT1/SPT2), the resistance is approximately 6.4 ohms per 1,000 feet. Using ProCore® C9 LEDs at 0.84W/bulb and 12" spacing:
- A run of ~150 feet (150 bulbs) will stay within a 3% voltage drop — the safest guideline for consistent brightness
- A run of ~200 feet (200 bulbs) approaches a 5% voltage drop — still functional, but you may notice slight dimming at the far end
- Runs beyond 200 feet will experience noticeable voltage drop and should be split into two separate runs, each powered from its own outlet
The practical rule of thumb used by professional Christmas light installers: keep each individual wire run to 150–200 feet maximum for consistent performance. For larger displays, plan multiple shorter runs originating from separate outlets or circuits rather than one long continuous run.
Putting It All Together: How to Plan a Large Display
Here's the correct way to think about electrical planning for a large C9 display:
- Size each run first, not the total display. Plan individual runs of 150–200 feet maximum. Each run gets its own outlet connection.
- Then add up the circuit load. Multiple runs can share a circuit as long as their combined wattage stays within the circuit's 80% capacity — but verify each run's wire current stays within SPT1 limits independently.
- Use separate circuits for large installs. A whole-house display will typically need 2–4 or more circuits. Plan power source locations as part of your initial layout, not as an afterthought.
- Account for all other devices on each circuit. Porch lights, exterior outlets used for other things, security cameras — their load reduces available capacity for your lights.
For SuperSpark® C9 Strobe bulbs at 2.25W per bulb, the current per bulb is approximately 0.019A — about 2.7× more than a ProCore® steady bulb. Because voltage drop accumulates faster with higher per-bulb current draw, the practical run length limit for SuperSpark® strobes is shorter than for ProCore® LEDs, not longer. Applying the same voltage drop formula, a SuperSpark® run reaches the 3–5% drop threshold at approximately 90–115 feet (bulbs) per run. Plan accordingly: strobe circuits should use more, shorter runs originating from separate outlets — not fewer, longer ones.
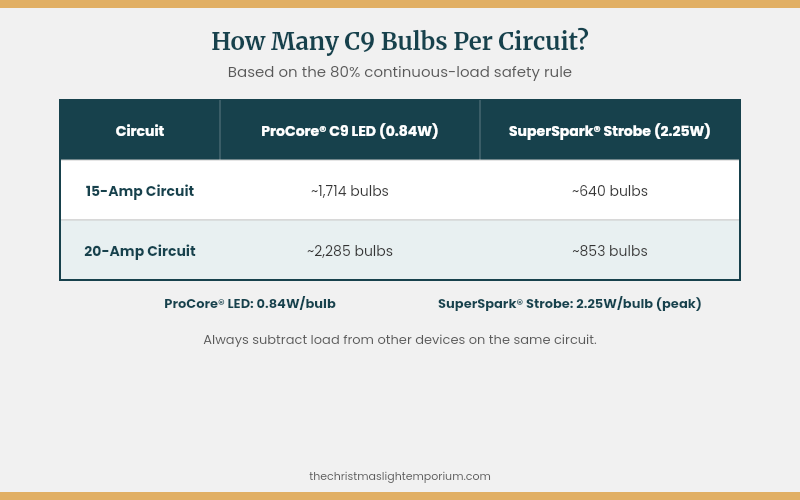
C9 Circuit Load Calculator (80% continuous-load rule): 15-Amp Circuit: ProCore® C9 LED at 0.84W = ~1,714 bulbs circuit max; SuperSpark® Strobe at 2.25W = ~640 bulbs circuit max. 20-Amp Circuit: ProCore® C9 LED at 0.84W = ~2,285 bulbs circuit max; SuperSpark® Strobe at 2.25W = ~853 bulbs circuit max. Note: These are total circuit capacity figures only — individual wire runs are limited by SPT1 ampacity and voltage drop. See electrical planning section for per-run limits.
GFCI Protection Is Required Outdoors
All outdoor electrical outlets must be protected by a GFCI (Ground Fault Circuit Interrupter). If your outdoor outlets don't have GFCI protection, have a licensed electrician install it before running any lights. GFCI breakers protect against ground faults that can cause electrical shock or fire — they're non-negotiable for outdoor holiday lighting.
Installation by Surface
Rooflines and Eaves
Roofline installation with C9s is one of the most impactful things you can do for your home's holiday curb appeal. The process involves choosing the right clip for your roofing material, laying the wire, and securing it at regular intervals.
We've written a complete, step-by-step guide dedicated entirely to this process. If roofline lighting is your primary goal, start there: How to Install Christmas Lights on Your Roof (Socket Wire Method).
For asphalt shingle roofs, the Shingle Speed Tab clips are the fastest option on the market. They install directly on a fully assembled light string — no pre-threading required — and fit C9, C7, and C6 strings. They're made from UV-stabilized poly for multi-season use.
Window and Doorway Outlines
Outlining windows and doorways with C9s is a signature look that elevates any home. This is one of the primary use cases for ProCore® C9 bulbs and one of the most satisfying installs you can do. Here's how to do it right.
Step 1: Measure the opening. Measure the full perimeter of the window or door frame — top, bottom, and both sides. Add 15% for corner wraps and any extra length needed to reach your power source.
Step 2: Choose your stringer length. For most standard windows, a 25' stringer covers the perimeter with room to spare. Larger windows and full door surrounds (including sidelights and transoms) may require a 100' stringer or a custom wire run.
Step 3: Plan your corners. At each corner, the wire needs to turn 90 degrees. With 12" spacing, you'll have a bulb near every corner — leave enough slack in the wire to make the turn cleanly without pulling on the sockets. Some installers prefer to use gutter clips or adhesive cable clips to hold the wire flush against the trim.
Step 4: Install socket seals before climbing. Before going up the ladder, slide a C9 Socket Seal (O-Ring) onto each socket on the stringer. The O-ring seats between the bulb base and the socket, creating a moisture-resistant barrier that prevents water intrusion at every connection point. Match the O-ring color to your wire color.
Step 5: Run the wire and clip it in place. Start at the power outlet and work outward. Use the appropriate clip for your trim material — most window trim responds well to standard gutter clips or adhesive nail clips. Keep the wire taut but not stretched. Every 2–3 sockets, secure with a clip.
Step 6: Screw in the bulbs. Once the wire is secured, screw in your ProCore® bulbs hand-tight. Do not over-tighten. The O-ring will compress slightly, creating the seal.
Step 7: Power and test. Plug in and inspect. Walk back across the street and look at the outline from a distance — it will often reveal slight misalignments that aren't visible up close. Adjust any clips that need repositioning while the lights are on so you can see the effect clearly.
Wrapping Outdoor Trees
Wrapping trees with C9s creates a dramatic focal point in your yard. The key is working from the base up and keeping even spacing as the branches widen.
Start at the base of the trunk. Anchor the male plug end of your stringer near an outlet, then begin wrapping the trunk, spiraling upward. Keep wraps approximately 6" apart on the trunk for a dense, full look. As you transition to the main branches, follow each branch outward from the trunk before returning to wrap the next one.
For tree wrapping, a 100' stringer typically covers a small to medium tree. Larger specimen trees may need multiple runs. Because pre-made stringers have a male plug only and cannot be daisy-chained directly, plan your outlet access and power routing before you start. Custom SPT wire with vampire plugs gives you the flexibility to run multiple segments from a single power source.
Railings and Decks
Deck railings and stair rails look stunning with C9 outlines. The approach is similar to window outlines — run the wire along the top rail first, then return along the bottom rail or vertically down each post if you want a grid look.
For railings, you can zip-tie the stringer wire to the rail every few sockets. Choose a zip tie color that matches your wire. On painted wood or composite railings, adhesive cable clips work well and leave no marks. Always add socket seals before installation and route the wire so it stays below the top of the rail — this prevents the wire from being a trip hazard and keeps the look clean.
Weatherproofing Your Installation
C9 Christmas lights installations are outdoor installations, and that means every connection point is exposed to rain, snow, ice, and temperature swings. Proper weatherproofing prevents bulb failure, socket corrosion, and tripped GFCI breakers.
Socket Seals (O-Rings): Install a C9 Socket Seal on every socket before installing bulbs. This is the single most important weatherproofing step. Without seals, water can enter the socket, corrode the contacts, and cause bulbs to fail or flicker.
Plug ends: Plug-in connections between runs are the most vulnerable points in your display. Wrap male-to-female connections with self-fusing silicone tape or use plug gaskets where available. Elevate plug connections off the ground so they can't sit in puddles.
Empty sockets: Any socket without a bulb is an open hole for water. If you have empty sockets at the end of a run, screw in a blank end cap or a spare bulb to seal them.
Drip loops: Where the wire enters an outlet, form a small downward loop before plugging in — this ensures water runs down and off the wire rather than following it into the outlet. Drip loops are standard practice in professional installs and make a measurable difference in outdoor electrical reliability.
All ProCore® C9 LED Christmas light bulbs from The Christmas Light Emporium are backed by the Reindeer Proof™ Warranty. Proper weatherproofing protects both the installation and your warranty coverage — bulbs that fail due to socket water intrusion from missing seals are preventable, not warrantable.
How Do You Mix C9 LED Christmas Light Effects?
The beauty of a modular C9 system is that you can mix effect types across your display for a layered, professional look. Here's how to think about combining different bulb types.
Steady + Twinkle: A classic combination. Run steady bulbs as the dominant tone across your roofline and windows, then scatter Twinkle bulbs at regular intervals — every 5th or 10th socket — for organic movement without chaos. The result looks dynamic without being distracting.
Steady + SuperSpark® Strobe: Place SuperSpark® strobes strategically at corners, peaks, or in trees to add punctuation to an otherwise steady display. Because each strobe fires independently at random, the effect reads as natural sparkle at distance. Run strobe bulbs on their own circuit segment, separate from any dimmer or controller.
RGB Color Changing: RGB bulbs are best used as a dedicated zone — a single tree, a doorway, or a focal point section of railing. Mixing RGB with steady single-color bulbs throughout a roofline can look busy. Used as an accent, they're eye-catching and conversation-starting.
If you're using a timer (and you should be), make sure all circuits in your display are on the same timer schedule. Nothing undermines a great display like one zone that stays on after the others have shut off.
Troubleshooting Common C9 Christmas Light Issues
A Bulb Isn't Lighting
First, try swapping the bulb with one from a working section of your display. If the replacement lights up, the original bulb is the issue — replace it. If the replacement also fails in the same socket, the socket itself may have a bad connection. Check that the socket seal isn't preventing full contact and that the socket's brass contact is clean and un-corroded. Replacement sockets are available if needed: Replacement Sockets.
The Breaker Trips When You Plug In
This usually means you've exceeded the circuit's capacity or there's a dead short somewhere. First, count your total bulb wattage and verify you're within the 80% continuous load limit for that circuit. If the math checks out, inspect the wire for any damage, pinched sections, or sockets that may have shorted. Also check the GFCI outlet — if it has tripped (not the breaker), press the reset button on the outlet itself before assuming a circuit problem.
The Line Looks Wavy or Uneven
Wavy lines are almost always a clipping issue. Add more clips between the uneven sockets and adjust the wire tension. On rooflines, make sure the wire is seated in the clip — not just resting against it. With shingle clips, press firmly until you feel the clip engage the shingle. A few extra clips per run is always better than too few.
Corner Alignment Looks Off
Corners are the most common place where C9 outlines break down. The fix is to have a bulb land exactly at the corner — not one socket before or after it. Before installation, measure from each end of the run toward the corner and determine which socket will land closest. If needed, use a small custom wire segment to shift the entire string so a socket lands on the corner. It's worth the extra 20 minutes for the result.
Takedown and Storage
A little care at takedown time pays off enormously next season. Start by removing bulbs from sockets before coiling the wire — this prevents the bulbs from breaking and the wire from tangling around them. Store bulbs in a rigid container (original packaging, an egg carton, or a dedicated bulb storage tray) so they can't rattle against each other.
Coil wire in large, loose loops rather than tight coils. Tight coiling stresses the wire insulation and leads to cracking over time. Label each coil with a tag noting its length, location (e.g., "front roofline — left run"), and bulb color. You'll thank yourself next October.
Store all components in a cool, dry location. Avoid areas subject to extreme temperature swings (uninsulated garages in cold climates, attics in hot climates) — temperature cycling is hard on wire insulation and plug contacts over many years.
Frequently Asked Questions
How many C9 Christmas light bulbs do I need per foot?
At the standard 12" spacing used on most C9 stringers, you need 1 C9 bulb per linear foot of roofline, window outline, or railing. Measure your total run length in feet, add 10% for corners and miscalculations, and that's your order quantity. For example: a home with 80 feet of roofline needs approximately 88–90 C9 bulbs.
What socket do C9 LED Christmas lights use?
All C9 Christmas lights use the E17 intermediate base — also called the C9 socket or intermediate socket. Every ProCore® C9 bulb, SuperSpark® strobe bulb, twinkle bulb, and RGB color-changing bulb fits any E17 socket stringer. If a stringer or wire is labeled E17, it's fully compatible with all C9 replacement bulbs from The Christmas Light Emporium.
How many C9 Christmas lights can I run end-to-end?
The practical limit for a single C9 Christmas light wire run is 150–200 feet (150–200 bulbs at 12" spacing) before voltage drop causes noticeable dimming at the far end. For larger displays, run multiple shorter segments — each powered from its own outlet — rather than extending a single run past 200 feet. Pre-made stringers have a male plug only and cannot be daisy-chained; custom SPT wire with vampire plugs gives you full layout flexibility.
Are C9 LED Christmas light bulbs dimmable?
ProCore® C9 LED steady-burn bulbs are fully dimmable when paired with a compatible LED dimmer. Twinkle bulbs may not be dimmable or may display undesirable behavior when used with a dimmer — run them on a standard timer circuit instead. SuperSpark® strobe and RGB color-changing C9 bulbs are not compatible with dimmers or chase controllers and must be run on their own non-dimmed circuit.
What is the difference between C7 and C9 Christmas lights?
The primary difference is size and socket. C9 Christmas lights use the E17 (intermediate) base and measure 9/8" across at their widest point — they're the large-format bulb used for rooflines, outdoor trees, and commercial displays. C7 Christmas lights use the smaller E12 (candelabra) base and measure 7/8" across — better suited for window outlines, smaller trees, and indoor use. C7 and C9 stringers, sockets, and bulbs are not interchangeable.
Can C9 LED Christmas lights be used outdoors?
Yes — all ProCore® C9 LED Christmas light bulbs from The Christmas Light Emporium are UL Listed for both indoor and outdoor use. Their polycarbonate lens and nickel-plated base handle rain, snow, ice, and temperature extremes. Always install C9 socket seals (O-rings) at every socket for moisture protection, and ensure all outdoor outlets have GFCI protection before plugging in.
What is the Reindeer Proof™ Warranty?
The Reindeer Proof™ Warranty is The Christmas Light Emporium's product guarantee covering ProCore® C9 LED bulbs and all other products we sell against defects and premature failure. We publish our pricing, stand behind every product, and don't make you jump through hoops if something goes wrong. Contact our customer service team if you experience a product issue — we're here to make it right.
Quick Reference Checklist
Use this list before, during, and after your installation:
- ✅ Measured all runs and calculated total linear footage
- ✅ Ordered bulbs, stringers, clips, socket seals, and a timer
- ✅ Mapped circuits — total wattage stays within 80% of each circuit's capacity
- ✅ Verified outdoor outlets have GFCI protection
- ✅ Installed socket seals on all sockets before running wire
- ✅ Secured wire every 2–3 sockets with appropriate clips
- ✅ Formed drip loops at every outlet connection
- ✅ Wrapped or sealed all plug-to-plug connections
- ✅ Capped all empty sockets at end of runs
- ✅ Tested all sections from across the street before declaring done
- ✅ Set timer — display runs on schedule automatically
- ✅ At takedown: removed bulbs before coiling wire, stored and labeled each run separately
C9 LED Christmas lights are the most versatile, durable, and energy-efficient way to create a large-scale outdoor Christmas display. With the right planning, the right components, and a little patience on the ladder, the result is a display that defines your home's holiday identity for years to come. Every product you need is covered by our Reindeer Proof™ Warranty — because lights that survive real weather and real installations are the only lights worth selling. Shop the full C9 LED Christmas light bulb collection and get everything you need in one place.


