How to Hang Christmas Lights Outside Without Nails: 6 Easy Tips

Ditch the Hammer, Embrace the Sparkle
Want to know how to hang Christmas lights outside without nails? This list offers six simple, damage-free methods for hanging your holiday lights, perfect for renters, homeowners wanting to preserve their siding, or anyone looking for a quicker, easier approach. Learn how to use outdoor Command hooks, clip-on gutter hooks, hot glue systems, magnetic clips, gutter shingle clips, and tension rod systems for a stunning, stress-free display. Skip the hammer and get straight to the sparkle!
1. How to Hang Christmas Lights Outside Without Nails Using Outdoor Command Hooks and Clips
One of the easiest and most effective ways to hang Christmas lights outside without nails is by using Command hooks and clips. These ingenious products from 3M offer a damage-free solution for hanging lights on various surfaces, eliminating the need for hammers, nails, and the potential for unsightly holes. Command hooks and clips utilize a special pressure-sensitive adhesive that bonds strongly to surfaces like vinyl siding, gutters, wood, and more, yet removes cleanly without leaving residue or damage. Outdoor versions are specifically designed to withstand the elements, offering weatherproof performance across a range of temperatures and conditions. This makes them ideal for holiday decorating, allowing you to achieve professional-looking results without compromising the integrity of your home's exterior. They are available in various sizes and weight capacities, often ranging from 1-5 pounds per hook, offering flexibility for different light string types and weights. You can also choose clear or white options to seamlessly blend with your home’s exterior.

The infographic above presents a simple decision tree for using Command hooks. It starts by asking if the surface is smooth, clean, and dry. If not, the user should clean the surface with isopropyl alcohol and let it dry. Next, it checks the temperature. If it's below 50°F (10°C), wait for warmer weather. If the temperature is suitable, apply the hook, press firmly for 30 seconds, and wait an hour before hanging lights. This straightforward guide helps ensure successful adhesion and prevents common issues. As the infographic clearly illustrates, surface preparation and temperature are critical factors for success with Command hooks.
Command hooks and clips are reusable, too. Simply purchase replacement adhesive strips to refresh their sticking power. This makes them a cost-effective solution in the long run, despite the initially higher price point compared to traditional nails or staples. Learn more about Outdoor Command Hooks and Clips This approach is perfect for anyone looking to hang Christmas lights outside without nails, offering a user-friendly experience without the need for specialized tools. From simple perimeter lighting to complex, large-scale displays, Command products offer a versatile solution for both homeowners and businesses. Examples of successful implementation include homeowners in suburban neighborhoods creating stunning perimeter lighting, large-scale residential holiday displays utilizing hundreds of clips for intricate designs, and commercial storefronts using Command hooks for eye-catching seasonal window displays.
Pros:
- Easy installation and removal
- No tools required
- Leaves no holes or damage
- Usable on various surfaces (vinyl, gutters, wood, etc.)
- Reusable with replacement strips
Cons:
- May not adhere well in extreme cold
- Higher initial cost than nails or staples
- Weight limitations (typically 1-5 pounds per hook)
- May not work well on dirty, textured, or porous surfaces
- Adhesive strength can diminish over time outdoors
Tips for Success:
- Clean thoroughly: Clean the surface with isopropyl alcohol before application.
- Temperature check: Apply when temperatures are above 50°F (10°C).
- Wait time: Wait at least 30 minutes after application before hanging lights.
- Firm pressure: Press firmly for 30 seconds when applying each hook or clip.
- Proper removal: Remove by pulling the tab straight down, not outwards.
Popularized by 3M and endorsed by home improvement experts like Bob Vila, Command hooks and clips have become a staple for damage-free decorating. DIY influencers across social media platforms like Instagram and Pinterest further demonstrate their versatility and effectiveness, showcasing creative applications for various decorating projects. If you're looking for a straightforward, no-fuss method for hanging Christmas lights outside without nails, Command hooks and clips are an excellent choice.
2. Clip-On Gutter Hooks: How to Hang Christmas Lights Outside Without Nails Using All Applications or 'Omni' Clips
Want to hang Christmas lights outside without nails and have gutters? Clip-on gutter clips, also commonly called All Application Clips or Omni Clips, offer a practical and damage-free solution. These specialized plastic clips are designed to attach directly to the edge of your rain gutters, eliminating the need for tools or any permanent installation. They work by hooking over the gutter's edge, creating a secure anchor point from which to hang your light strings. The clever design helps distribute the weight evenly and ensures your lights are positioned in neat, straight lines along your rooflines. This method is a a significant upgrade for achieving a professional look without the hassle of hammers and nails.
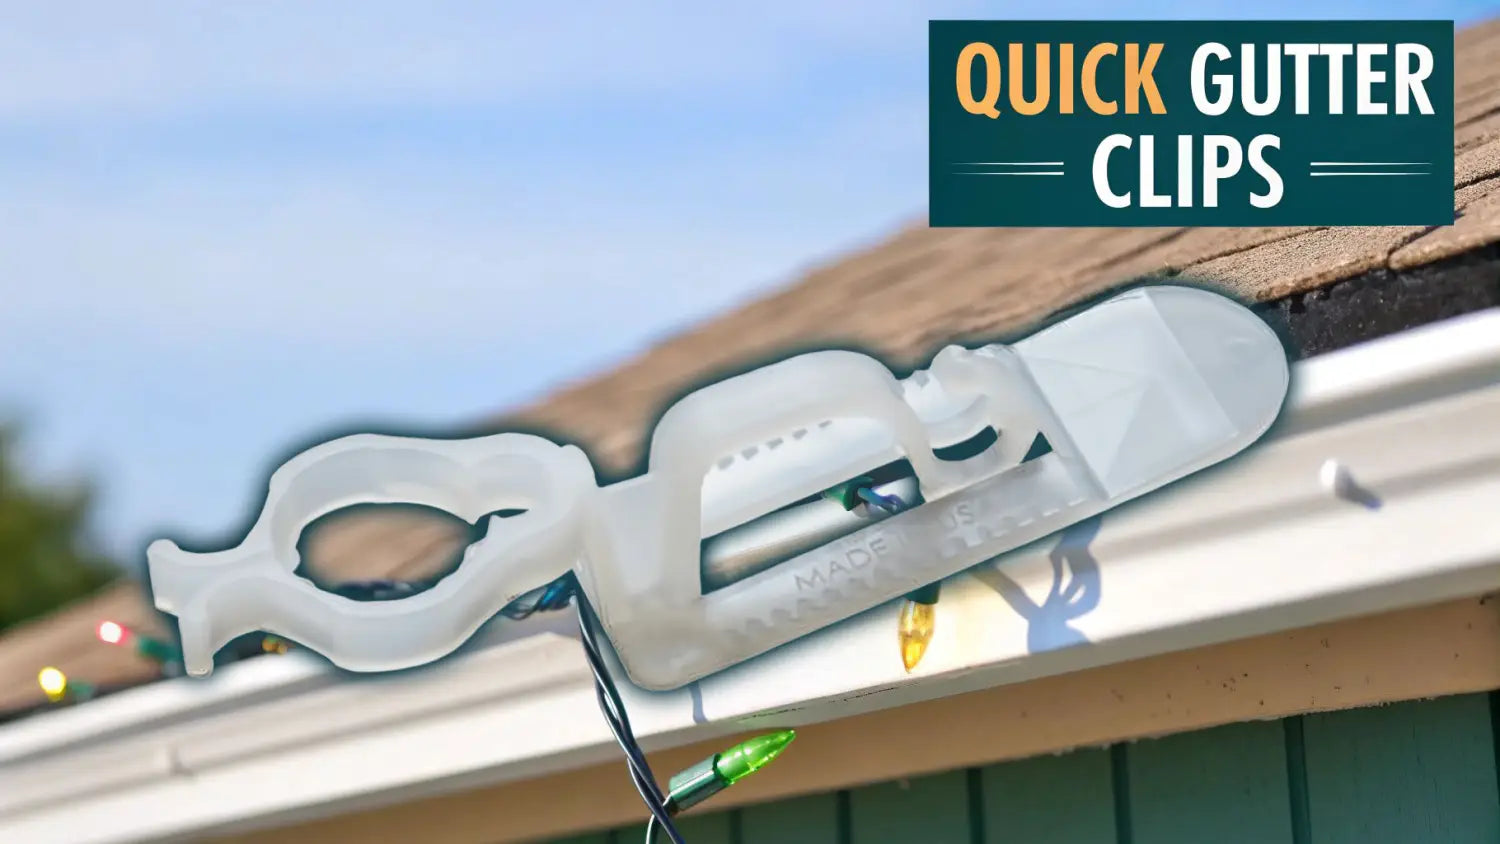
Clip-on gutter hooks are available in various designs to accommodate different gutter types and sizes. Some even include built-in light clips or multiple hanging points for added versatility. Manufactured from UV-resistant plastic or rust-resistant metals, these hooks are designed for durability and reusability year after year. This makes them a cost-effective and convenient choice for anyone looking to simplify their holiday decorating process. Learn more about Clip-On Gutter Hooks
This approach is ideal for homeowners seeking a straightforward, no-fuss method for hanging Christmas lights outside without nails, especially if they want to avoid potential damage to their property. Professional holiday lighting companies frequently utilize commercial-grade gutter clips for efficient and damage-free client installations, showcasing the effectiveness of this method. Similarly, many community associations embrace uniform gutter hook systems to create coordinated and visually appealing neighborhood displays. Homeowners can also easily outline their entire rooflines with minimal effort using these handy clips. Check out the large selection of gutter clips for Christmas lights at The Christmas Light Emporium.
Tips for Success:
- Spacing: Space the hooks approximately 12-24 inches apart, adjusting based on the weight of your light strings.
- Pre-Installation: Install the hooks onto your strings before hanging the lights for easier handling and positioning.
- Uniform Direction: Ensure all clips face the same direction for a cleaner, more professional appearance.
- Windy Areas: Consider using zip ties to secure light strands to the hooks for added stability in windy conditions.
- Storage: Store the clips attached to your lights for even faster setup next season.
Pros:
- Quick snap-on installation requiring no tools.
- No holes or damage to gutters.
- Consistent spacing for professional results.
- Easy installation and removal.
- Keeps wires away from water.
Cons:
- Requires gutters.
- May not fit all gutter systems (ie those with micro screen gutter guards installed).
- Can be displaced by strong winds if not secured properly.
- Visible from ground level (though most are discreet).
- Quality varies between brands. We highly recommend Tuff Clips for C7 and C9 bulb installations.
3. How to Hang Christmas Lights Outside Without Nails Using Hot Glue Systems
For those looking for a nail-free way to hang Christmas lights outside on surfaces where traditional adhesive hooks struggle, hot glue systems offer a practical and cost-effective solution. This method involves using a high-temperature glue gun (typically operating at 300°F or higher) along with specialized weatherproof glue sticks to securely affix your lights. This technique is an excellent alternative when you’re searching for how to hang Christmas lights outside without nails, especially on materials like brick, stone, concrete, or stucco.
Hot glue systems work by creating small, discrete dots of adhesive that bond the light strands or clips directly to the surface. This provides surprisingly strong hold, even for heavier light strands, while remaining virtually invisible from a distance. Because you're applying small dots of glue, you have great control over the placement of your lights, making it ideal for intricate designs and irregular architectural features. This precision is why professional Christmas light installation companies, as well as brands like Surebonder and Ad-Tech (makers of outdoor glue sticks and adhesives), have popularized the technique. They often use hot glue for outlining commercial buildings or decorating historic buildings where preserving the facade is crucial and drilling holes is not an option. Homeowners, too, find this method valuable for decorating stone and brick homes with complex details.
When to Use Hot Glue Systems:
This approach is particularly beneficial when:
- You're working with brick, stone, concrete, or stucco where adhesive hooks often fail.
- You need precise placement on irregular surfaces or intricate architectural details.
- You want a cost-effective solution compared to specialized lighting clips.
- You’re seeking a no-hole solution to protect your surfaces.
Pros:
- Strong hold, even for heavier light strands.
- Precise placement on irregular architectural features.
- Cost-effective compared to specialized clips.
- Invisible from a distance.
- Works on surfaces where adhesive hooks fail.
Cons:
- Requires access to electrical outlets during installation.
- Time-consuming removal process.
- Can damage some delicate surfaces (vinyl, aluminum, painted surfaces – avoid these. And be extra careful when using on brick so as to not remove layers of your brick facade when taking your lights down).
- Requires practice for clean application.
Tips for Success:
- Test first: Before applying anywhere visible, test the glue on an inconspicuous area to ensure it doesn't damage the surface.
- Glue the socket: Apply the glue to the bulb socket, not the wire, for a stronger, more secure hold.
- Small dots: Use small, pea-sized dots of glue rather than large globs. This makes removal easier and looks cleaner.
- Work in sections: Apply glue and place lights in small sections to prevent the glue from cooling before the lights are attached.
- Removal: Gently twist the glue dots off after the holiday season. Stubborn spots can be softened with rubbing alcohol.
By following these guidelines, you can successfully utilize hot glue systems to create stunning, damage-free holiday displays. This method, while requiring a little more effort than adhesive hooks, offers a highly versatile and effective way to hang Christmas lights outside without nails, making it a worthy addition to this list.
4. Magnetic Clips and Hangers
Want to hang Christmas lights outside without nails and have a metal surface to work with? Magnetic clips and hangers are your answer. These ingenious tools utilize powerful neodymium or ceramic magnets to firmly grip metal surfaces, providing secure anchors for your holiday lights. This eliminates the need for drilling, hammering, or any other permanent installation methods. They’re a particularly appealing option for how to hang Christmas lights outside without nails on metal surfaces.
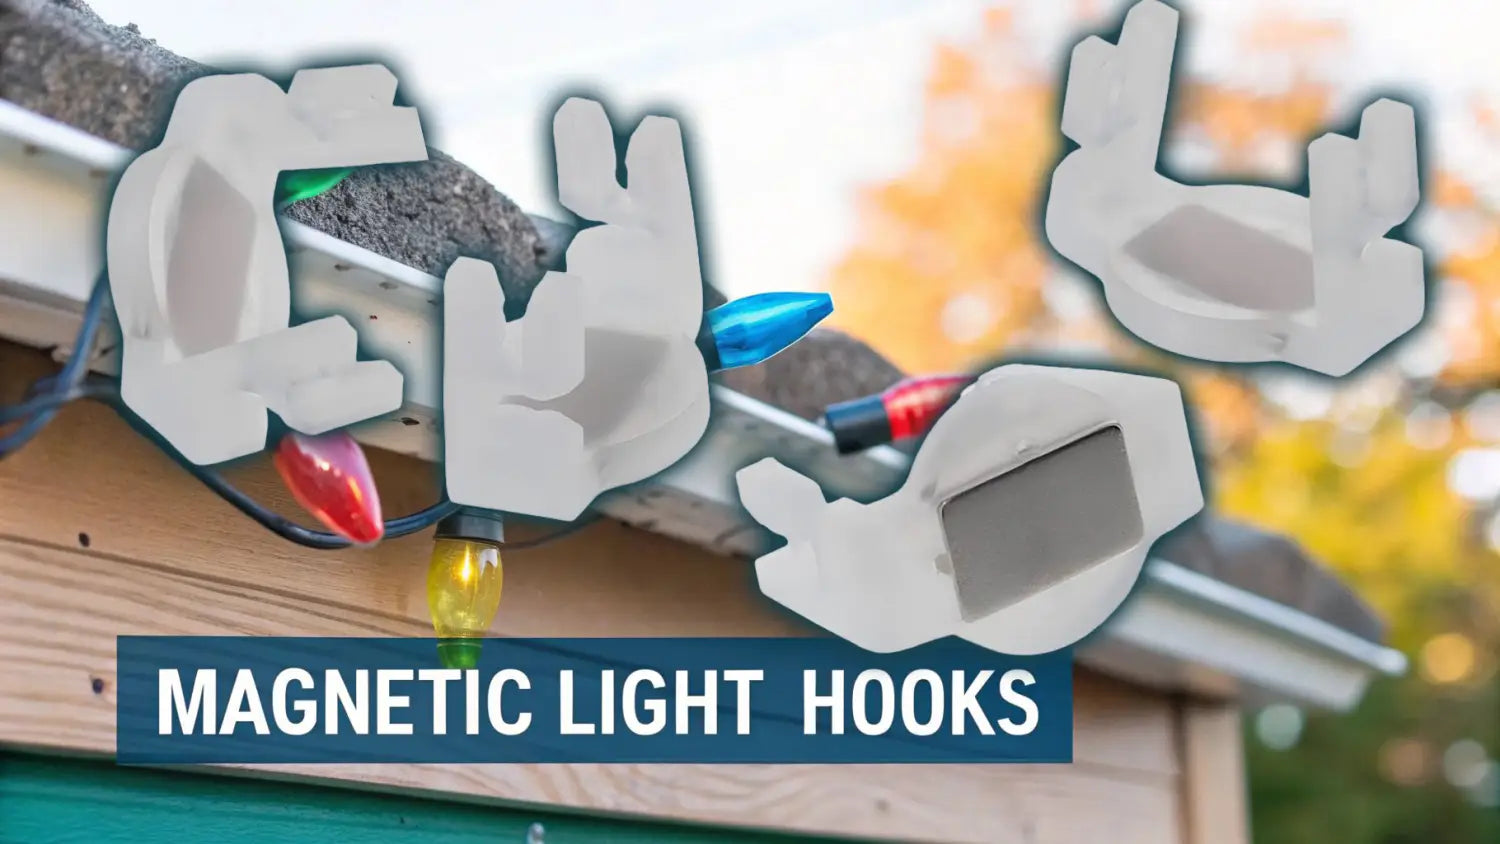
These specialized clips are designed to attach to a variety of ferromagnetic surfaces, including metal gutters, flashing, steel siding, and garage doors. The magnets are typically encased in plastic clips or hooks to prevent scratching and rust stains. You can find a variety of designs tailored for different light types, from mini lights to larger C7 and C9 bulbs, and even icicle lights. Some models even incorporate swivel heads for directional adjustment, giving you complete control over your light display. Best of all, they're reusable for many seasons, making them a cost-effective solution year after year.
Learn more about Magnetic Clips and Hangers
This approach shines when you need a quick, non-damaging solution for metal surfaces. Think metal roofs, gutters, or the metal framing around windows and doors. They're also invaluable in cold weather when adhesive-based solutions might fail. Commercial buildings with metal facades often utilize magnetic systems for elaborate displays, while homeowners with metal roofs find them perfect for outlining their homes with festive cheer. Storefronts also benefit from the ease and flexibility of magnetic clips for creating eye-catching window displays.
Pros:
- Instant attachment and removal: No messy adhesives or time-consuming installations.
- Fast installation: Quickly cover large areas with minimal effort.
- Cold-weather performance: Works reliably even in freezing temperatures.
- Easy repositioning: Adjust your lights with ease during installation.
- Ideal for metal surfaces: Perfect for roofs, gutters, and other ferrous materials.
Cons:
- Limited surface compatibility: Only works on ferromagnetic surfaces (not aluminum or some stainless steels).
- Cost: Stronger magnets can be more expensive.
- Potential slippage: May slide on smooth surfaces if not secured properly.
- Weight limitations: Holding capacity is determined by magnetic strength.
- Scratching risk: Dirt trapped between the magnet and the surface can cause scratches.
Tips for Success:
- Clean the metal surface thoroughly before applying the clips to maximize magnetic grip.
- Choose light strands with wire that matches the color of your surface for a seamless look.
- Space the magnets closer together for heavier light strings to ensure adequate support.
- Test the holding strength in a small area before installing all your lights.
- Consider adding small silicone or rubber pads to the clips to prevent sliding on smooth surfaces.
5. Gutter Shingle Clips (Shingle Tabs)
Gutter shingle clips, more commonly called Shingle Tabs, offer a practical and damage-free way to hang Christmas lights outside without nails. These specialized clips, typically made of weather-resistant plastic or coated metal, slide under your roof shingles, utilizing the shingle overlap as a secure clamping mechanism. This avoids penetrating the roof, preserving its integrity and preventing potential leaks. The clips distribute the weight of the lights safely and keep them neatly aligned along your rooflines, giving your display a professional look.
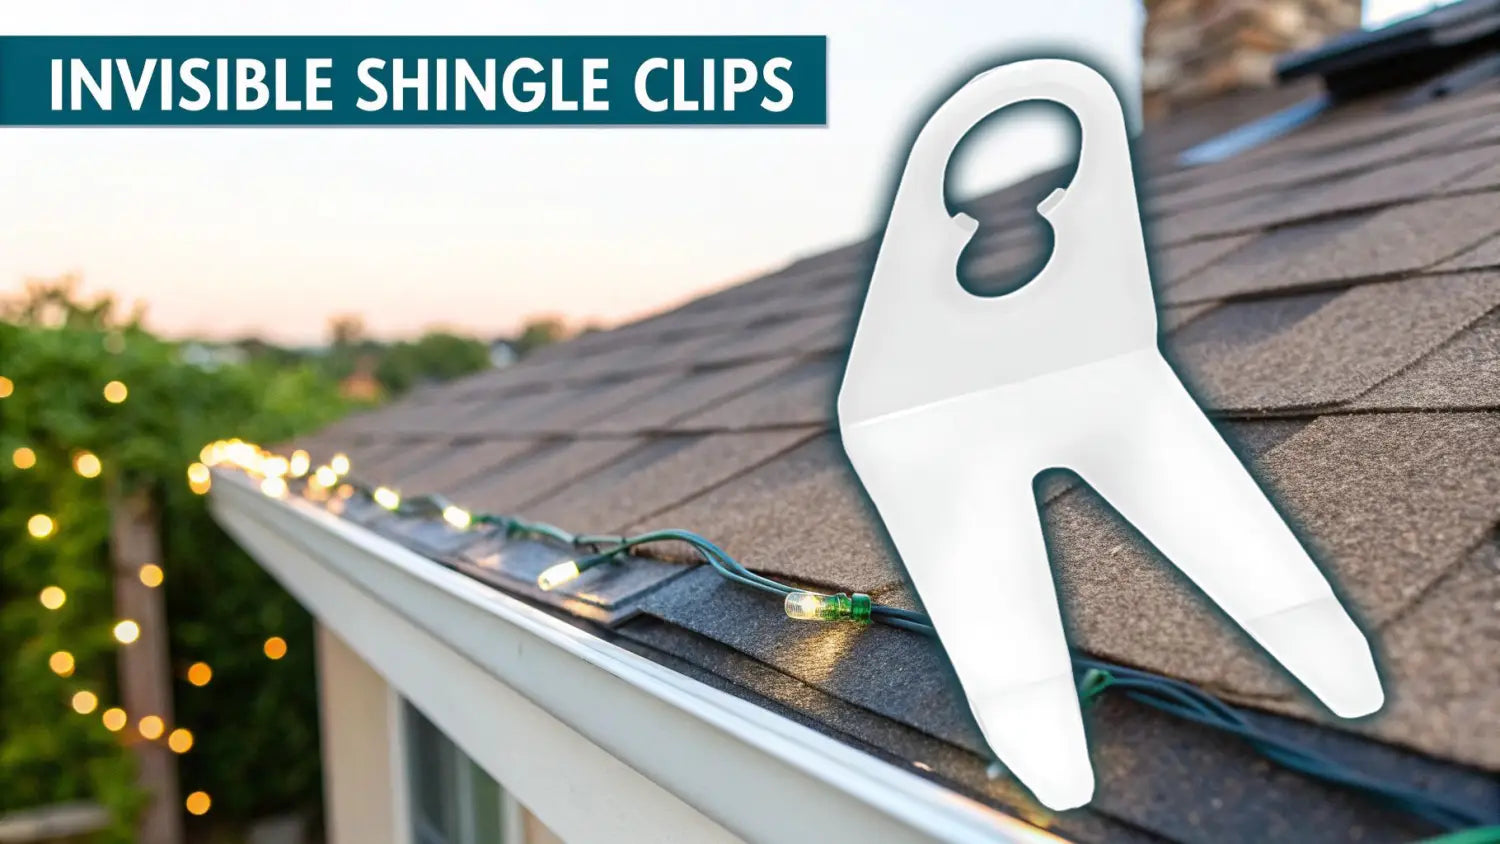
These low-profile clips remain virtually invisible from ground level, enhancing the visual appeal of your light display. Many models include built-in hooks or clips specifically designed to hold light strands securely, and some even offer multiple mounting positions for added versatility. They're available in various colors to match common roof shingle colors, further minimizing their visibility. This method is an excellent alternative to using nails, screws, or adhesive hooks, all of which can damage your roof and create entry points for water. For homeowners wanting to know how to hang Christmas lights outside without nails, shingle clips are a top choice.
Professional holiday lighting companies frequently utilize shingle clips for high-end residential installations, demonstrating their effectiveness and reliability. Homeowners, too, are increasingly adopting this method to achieve professional-looking roofline lighting on multi-story homes, while some neighborhood associations even employ standardized shingle clip systems for uniform holiday displays. Learn more about Gutter Shingle Clips for specific product information.
Pros:
- No roof penetration, preventing leaks and damage
- Perfectly straight light lines along rooflines
- Virtually invisible from the ground
- Compatible with most asphalt shingle roofs
- Can often be left in place year-round
Cons:
- Requires careful handling to avoid damaging shingles
- Not suitable for tile, metal, or flat roofs
- Installation involves working at heights (ladder safety is crucial)
- May shift in strong winds if not properly secured
- Can be challenging to install in extremely cold weather
Tips for Using Gutter Shingle Clips:
- Use a plastic putty knife to gently lift the shingles, minimizing the risk of damage.
- Install clips when temperatures are above 40°F for optimal shingle flexibility.
- Space clips approximately 12-24 inches apart, depending on the weight of your lights.
- Avoid lifting shingles excessively to maintain their seal.
- Consider a tool with an extension pole for hard-to-reach areas.
This video provides a visual guide to installing gutter shingle clips:
▶ Watch: Christmas Light Clips For Roof Line: Shingle and Gutter
Gutter shingle clips deserve a place on this list due to their effectiveness, ease of use (with practice), and the professional results they deliver. They offer a safe, secure, and aesthetically pleasing solution for hanging Christmas lights without damaging your roof. Brands like SimpleHouseware and recommendations from Christmas Designers and retailers like Home Depot and Lowe’s have further popularized this convenient method.
6. Tension Rod and Pole Systems
Want to hang Christmas lights outside without nails and avoid damaging your surfaces? Tension rod and pole systems offer an ingenious solution, especially if you're in a rental property or prefer a damage-free approach. This method leverages the principle of tension to securely hold your lights, making it an excellent choice for how to hang Christmas lights outside without nails. Essentially, expandable rods, poles, or wires are positioned between two fixed points—like window frames, porch columns, or eaves—creating pressure that holds the system, and your lights, firmly in place.
These systems work by extending a rod or pole until it creates enough pressure against two opposing surfaces to stay securely in place. Think of it like a spring-loaded curtain rod, but designed to hold the weight of your holiday lights. Advanced versions feature specialized clips and connectors specifically designed for hanging Christmas lights, streamlining the process and providing a more secure hold. These systems are available in various lengths and weight capacities, giving you flexibility based on the size and scope of your display. They typically utilize weather-resistant materials like aluminum, steel, or high-grade plastic for outdoor durability.
For example, apartment dwellers can easily hang indoor-facing light displays using window tension rods. In rental homes with porch columns, pole systems offer a perfect way to string lights without putting holes in the structure. Businesses often use tension wire systems across storefront windows to create festive holiday displays. Learn more about Tension Rod and Pole Systems
Features and Benefits:
- Expandable and Adjustable: Tension rods adjust to various widths, accommodating different spaces.
- Spring-Loaded Mechanisms: Constant pressure ensures a secure hold even in changing weather conditions.
- Integrated Clips/Attachment Points: Simplifies light hanging and keeps the display organized.
- Weather-Resistant Materials: Ensures longevity and performance throughout the holiday season.
- Creates Perfectly Straight Light Lines: Achieving a professional and polished look is easy with this method.
Pros:
- Damage-Free Installation: Perfect for renters or homeowners who want to avoid holes.
- Easy Adjustment and Repositioning: Change your display quickly and easily.
- Ideal for Specific Locations: Windows, doorways, and covered porches are prime locations.
Cons:
- Requires Opposing Surfaces: Not suitable for all locations.
- Weight Limitations: May not be suitable for heavy displays.
- Potential for Surface Damage (if improperly used): Ensure proper tension to avoid this issue.
- Higher Cost: More expensive than basic clips.
- Visible Hardware: May affect aesthetics, though you can paint the rods to blend in.
Tips for Success:
- Use Rubber End Caps: Prevent slipping and protect your surfaces from scratches.
- Angle for Drainage: Install at a slight upward angle to allow water runoff.
- Pre-Attach Clips: Makes hanging lights significantly easier.
- Check Tension Regularly: Especially after storms or strong winds.
- Consider Painting Rods: To match your trim for a more seamless appearance.
Companies like Keystone Adjustable Cap & Wire (professional-grade tension systems) and Kwik-Hang (adapted curtain rod brackets for lighting), as well as numerous DIY influencers, have popularized this method, making it a go-to solution for rental-friendly and damage-free holiday decorating. This approach deserves a place on this list because it offers a practical, versatile, and relatively simple way to hang Christmas lights outside without causing any lasting damage to your property.
6 Methods for Hanging Outdoor Lights Without Nails
|
Technique |
Implementation Complexity 🔄 |
Resource Requirements ⚡ |
Expected Outcomes ⭐📊 |
Ideal Use Cases 💡 |
Key Advantages 💡 |
|---|---|---|---|---|---|
|
Outdoor Command Hooks and Clips |
Low - no tools, simple adhesive application |
Moderate - purchase hooks and replacement strips |
High effectiveness for light strings under 5 lbs, damage-free |
Smooth, clean surfaces above 50°F; vinyl siding, gutters, wood |
Easy install/removal, no damage, reusable strips |
|
Clip-On Gutter Hooks |
Very low - snap-on, no tools |
Low - plastic or metal clips |
Consistent spacing, neat light lines |
Homes with standard gutters |
Quick install, no holes, reusable, protects wires |
|
Hot Glue Systems |
Moderate - requires glue gun skill and power |
Moderate - glue gun, weatherproof glue sticks |
Strong hold on irregular/porous surfaces |
Brick, stone, concrete, intricate details |
Cost-effective, precise placement, strong hold |
|
Magnetic Clips and Hangers |
Very low - instant attachment on ferrous metal |
Moderate - neodymium magnets |
Secure grip even in cold, fast install/removal |
Metal roofs, steel siding, metal gutters |
Fast install, repositionable, no residue |
|
Gutter Shingle Clips |
Moderate - requires roof edge access and care |
Low to moderate - plastic/metal clips |
Clean, straight lines, nearly invisible |
Asphalt shingle roofs |
No roof damage, weather-resistant, neat look |
|
Tension Rod and Pole Systems |
Moderate - requires tension adjustment and setup |
Moderate - rods/poles with clips |
Straight, damage-free installation |
Windows, doorways, porches, rental properties |
Damage-free, adjustable, repositionable |
Nail-Free Door Decorating: Framing Your Entry Without Damage
Your front door is one of the highest-visibility spots on your home — and one of the easiest to damage with staples or nails. Purpose-built clips make door decorating clean and reversible.
Measure the frame. Run a tape measure up one side of the door frame, across the top, and down the other side. Add 12–18 inches of slack for plug access. A standard 36-inch entry door typically needs about 17–18 feet of light string for a single-row outline.
Start at the bottom. Clip your first light near the base of the hinge side, then work upward. Space clips every 8–10 inches to keep the string taut. Continue across the header and down the latch side.
Layer with greenery. Lights alone look sharp — lights woven through a pre-lit garland draped across the door header look extraordinary. Pair with a pre-lit wreath hung center-door with an over-the-door hook for a professional layered look — all without a single hole in the woodwork.
Color tips for doors: Warm white works on every door color. Cool white pairs beautifully with gray, black, or navy doors. Gold mini lights against a dark green or burgundy door create a rich, almost regal effect. For a clean unbroken line of light, warm white LED rope light bends smoothly around door frame corners.
Safety Essentials for Hanging Lights at Heights
Working at heights is the riskiest part of any light installation. According to the U.S. Consumer Product Safety Commission, about 14,900 people were treated in ERs for decorating-related injuries during the 2022–2023 holiday period — nearly half from falls.
- Ladder safety: Extend at least 3 feet above the landing, set on level ground, and maintain three points of contact while climbing.
- GFCI protection: Plug all outdoor displays into GFCI-protected outlets. They trip instantly when they detect a ground fault, protecting against shock in wet conditions.
- Use outdoor-rated products: Look for lights and accessories with a UL rating for outdoor use. UL 588 certification confirms proper wire size, strain relief, and overcurrent protection.
- PPE: Wear gloves to prevent cuts, safety glasses for debris protection, and consider a safety harness for significant heights.
Shine Bright This Holiday Season
Hanging Christmas lights outside without nails has never been easier or more versatile thanks to these innovative methods. From utilizing Command hooks and clips for smaller displays to setting up elaborate tension rod systems for larger installations, you now have a damage-free solution for every scenario. Remember the key takeaway is to choose the method that best suits your home's exterior and the specific type of Christmas lights you're using. Whether you’re using gutter hooks, magnetic clips, or even a hot glue system (for appropriate surfaces), mastering these no-nail techniques not only preserves your home's exterior but also allows for greater flexibility and creativity in your holiday decorating. This means less time worrying about repairs and more time enjoying the festive glow with friends and family.
By avoiding nails, you'll be able to easily change up your light display year after year and experiment with different looks without the commitment of permanent holes. This holiday season, let your creativity shine, knowing you have the tools and techniques to hang Christmas lights outside without nails effectively and safely. Ready to take your display to the next level? Discover a dazzling array of high-quality Christmas lights and decorations perfect for any hanging method at The Christmas Light Emporium. They have everything you need to create a truly spectacular holiday display, complementing your newfound nail-free hanging skills perfectly.
Frequently Asked Questions
What is the best way to hang Christmas lights without damaging your house?
Purpose-built Christmas light clips are the safest and most effective option. Shingle clips grip the edge of roofing material, gutter clips hook onto gutter lips, and all-surface clips attach to trim and siding — all without nails, screws, or adhesive that could leave marks or holes.
Can you hang Christmas lights with command strips?
Command strips and adhesive hooks can work on smooth, flat surfaces like vinyl siding or painted trim in moderate climates. However, they struggle in freezing temperatures or on textured surfaces. For rooflines and gutters, dedicated Christmas light clips are far more reliable and easier to remove.
How do you hang Christmas lights on gutters without clips?
While some people use zip ties or twist ties threaded around gutter brackets, these methods risk scratching the finish or being difficult to remove. Gutter clips designed specifically for Christmas lights are inexpensive, reusable season after season, and install in seconds without any modification to your gutters.
Do Christmas light clips work on all roof types?
Most shingle clips are designed for standard asphalt shingles. Metal roofs, tile roofs, and slate require specialized clips or mounting methods — magnetic clips for metal, and adhesive-based mounts for tile. Always match the clip type to your specific roofing material to avoid damage.
How do you hang icicle lights without nails?
Icicle lights hang beautifully from gutter clips or eave clips that grip your gutter lip or drip edge. Space clips every 12 to 18 inches to keep the strand taut and prevent sagging. No nails, no holes, and the clips pop off cleanly when the season is over.
Can you reuse Christmas light clips every year?
Quality clips made from UV-resistant materials are absolutely reusable. After the season, remove them from the roofline or gutters, give them a quick rinse if needed, and store them with your lights. Good clips last as long as the lights themselves.


