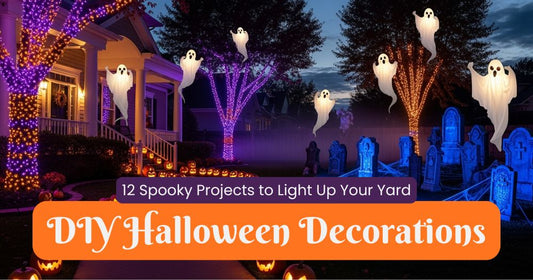
DIY Halloween Decorations Using Christmas Lights: 12 Spooky Projects That'll Light Up Your Yard

Why Christmas Lights Are Your Secret Weapon for Halloween
Here's something most people don't realize: those Christmas lights sitting in your garage aren't just for December. They're actually the perfect foundation for creating DIY Halloween decorations that'll make your house the talk of the neighborhood. While everyone else is fumbling with battery-powered decorations that die halfway through the evening, you'll be running a professional-grade display that lasts all night, every night.
The beauty of using LED string lights for Halloween is simple—they're weatherproof, energy-efficient, and incredibly versatile. You can wrap them, drape them, stuff them into props, or outline architectural features. Plus, with the right color palette, you can create an atmosphere that ranges from playfully spooky to genuinely unsettling.
Let's dive into 12 DIY Halloween decorations that use Christmas lights as their backbone. Each project includes the specific products you'll need and step-by-step instructions.
Project 1: Glowing Jack-O'-Lantern Pathway
Difficulty: Easy | Time: 30 minutes | Cost: $$
Create a welcoming (or menacing) pathway lined with illuminated pumpkins using orange LED lights.
What You'll Need:
- Orange LED String Lights
- Plastic or foam pumpkins (craft store)
- Drill with large bit
- Extension cord
Instructions:
- Drill a hole in the bottom of each artificial pumpkin, large enough to feed your light strand through
- Stuff 15-20 orange LED bulbs inside each pumpkin, leaving the plug end accessible
- Arrange pumpkins along your walkway, spacing them 3-4 feet apart
- Connect the strand and plug into your outdoor outlet
- For extra effect, carve faces into some pumpkins before adding lights
Pro Tip: Use warm orange LEDs for a traditional glow, or mix in some red bulbs for a more sinister vibe.
Project 2: Spooky Tree Silhouettes
Difficulty: Medium | Time: 1-2 hours | Cost: $$$
Transform your front yard trees into eerie focal points with strategic uplighting and branch wrapping.
What You'll Need:
- Purple LED String Lights
- Green LED String Lights
- Outdoor-rated extension cords
- Light clips or zip ties
Instructions:
- Start at the base of your tree and wrap purple lights around the trunk in a spiral pattern
- Extend the lights out onto major branches, following the natural architecture
- Place green LED strands at the tree's base, angled upward to create an eerie uplighting effect
- Focus on creating dramatic shadows by lighting from below rather than wrapping every branch
- Step back frequently to check the silhouette effect from the street
Why This Works: Purple and green are classic Halloween colors that create an otherworldly atmosphere. The uplighting technique casts unusual shadows that make familiar trees look genuinely creepy.
Project 3: Floating Ghost Lights
Difficulty: Easy | Time: 45 minutes | Cost: $
Create the illusion of floating spirits using white fabric and cool white LED lights.
What You'll Need:
- Cool White LED String Lights
- White cheesecloth or gauze (2-3 yards per ghost)
- Styrofoam balls (6-8 inch diameter)
- Fishing line
- Tree branches or porch overhang for hanging
Instructions:
- Wrap 8-10 cool white LED bulbs around each styrofoam ball, securing with pins
- Drape cheesecloth over the ball, letting it hang naturally to create a ghostly shape
- Tie fishing line around the "neck" of the ghost
- Hang at varying heights from tree branches or your porch ceiling
- Connect the light strands and plug in at dusk
The Effect: When lit from within, these ghosts appear to glow and float in the darkness. A slight breeze makes them sway, adding to the supernatural effect.
Project 4: Haunted Window Silhouettes
Difficulty: Medium | Time: 1 hour | Cost: $$
Create creepy silhouettes in your windows using backlighting techniques.
What You'll Need:
- Orange LED String Lights or Red LED String Lights
- Black poster board or cardboard
- Scissors or craft knife
- Tape
Instructions:
- Cut spooky silhouettes from black poster board (witches, bats, zombies, haunted houses)
- Tape the silhouettes to the inside of your windows
- String orange or red LED lights behind the silhouettes, about 6-12 inches from the window
- Close your curtains or blinds to diffuse the light
- The silhouettes will appear as dark figures against the glowing background
Design Tip: Keep silhouettes simple with bold shapes. Complex details get lost in the backlighting.
Project 5: Spider Web Corner Display
Difficulty: Easy | Time: 30 minutes | Cost: $
Highlight artificial spider webs with strategic lighting for maximum impact.
What You'll Need:
- Purple LED String Lights
- Artificial spider webbing (craft store)
- Plastic spiders in various sizes
- Light clips
Instructions:
- Stretch spider webbing across porch corners, doorways, or between bushes
- Weave purple LED lights through the webbing, following the web pattern
- Place plastic spiders strategically on the web
- Secure lights with clips to prevent sagging
- The purple glow makes the webs visible at night while maintaining the creepy factor
Project 6: Graveyard Scene with Ground Fog Effect
Difficulty: Hard | Time: 2-3 hours | Cost: $$$
Build a complete graveyard display with atmospheric lighting.
What You'll Need:
- Blue LED String Lights
- Cool White LED String Lights
- Foam tombstones (craft store or DIY)
- Low-lying fog machine (optional)
- Black landscape fabric
Instructions:
- Arrange tombstones in your front yard in a cemetery layout
- Lay black landscape fabric as "ground" between tombstones
- Place blue LED lights at the base of tombstones, angled upward for dramatic lighting
- String cool white lights low to the ground, weaving between tombstones
- If using a fog machine, position it upwind so fog drifts through the graveyard
- The blue uplighting creates an eerie moonlight effect while the white ground lights add depth
Advanced Technique: Add a light controller to create a slow fade or flicker effect on the tombstone lights.
Project 7: Creepy Crawly Bush Lights
Difficulty: Easy | Time: 20 minutes | Cost: $
Make your landscaping look infested with glowing eyes.
What You'll Need:
- Red LED String Lights
- Toilet paper tubes (2 per pair of eyes)
- Black spray paint
- Scissors
Instructions:
- Cut toilet paper tubes in half
- Spray paint them black and let dry
- Insert one red LED bulb into each tube half
- Position pairs of tubes in bushes, hedges, or under porches to create "glowing eyes"
- Space them irregularly for a more organic, creepy effect
- The tubes focus the light forward, creating intense red "eyes" staring out from the darkness
Project 8: Witch's Cauldron Centerpiece
Difficulty: Medium | Time: 45 minutes | Cost: $$
Create a bubbling cauldron effect for your porch or entryway.
What You'll Need:
- Green LED String Lights
- Large black cauldron or pot
- Clear or white plastic bags
- Small fan (battery-operated)
- Dry ice (optional, for real fog effect)
Instructions:
- Stuff green LED lights into the cauldron, concentrating them in the center
- Layer clear or white plastic bags over the lights, creating a "bubbling" texture
- Position a small fan to make the bags move slightly
- For added effect, place dry ice in water inside the cauldron for real fog
- The green glow through the moving plastic creates a convincing bubbling brew effect
- Safety Note: If using dry ice, ensure proper ventilation and keep away from children and pets.
Project 9: Outlined Architectural Features
Difficulty: Medium | Time: 1-2 hours | Cost: $$-$$$
Use lighting to emphasize your home's architecture in spooky colors.
What You'll Need:
Instructions:
- Outline your roofline with orange LED lights using appropriate clips
- Outline windows and doors with purple lights
- Emphasize architectural details like columns, arches, or gables
- Keep lines clean and straight for a professional appearance
- Alternate colors or create patterns based on your home's style
Why This Works: Architectural lighting transforms your entire house into a Halloween decoration. It's visible from blocks away and creates massive curb appeal.
Project 10: Glowing Potion Bottles
Difficulty: Easy | Time: 30 minutes | Cost: $
Create a witch's apothecary display with illuminated bottles.
What You'll Need:
- Green LED String Lights
- Purple LED String Lights
- Blue LED String Lights
- Clear glass bottles in various sizes
- Labels and markers for bottle names
Instructions:
- Insert 3-5 LED bulbs into each bottle (use different colors for variety)
- Create spooky labels: "Dragon's Blood," "Witch Hazel," "Essence of Nightmare"
- Arrange bottles on a table, shelf, or window ledge
- Connect all strands to a single power source
- The colored lights glowing through glass create an authentic potion effect
Project 11: Spooky Pathway Stakes
Difficulty: Easy | Time: 45 minutes | Cost: $$
Line your walkway with custom-lit Halloween stakes.
What You'll Need:
- Orange LED String Lights
- Wooden or metal garden stakes
- Halloween cutouts (bats, cats, witches)
- Zip ties or wire
- Black paint or markers
Instructions:
- Attach Halloween cutouts to the top of each stake
- Wrap orange LED lights around each stake in a spiral pattern
- Secure lights with zip ties or wire
- Push stakes into the ground along your pathway, spacing 2-3 feet apart
- Connect strands end-to-end for continuous lighting
Project 12: Illuminated Porch Columns
Difficulty: Medium | Time: 1 hour | Cost: $$
Transform porch columns into glowing pillars of Halloween spirit.
What You'll Need:
- Purple LED String Lights
- Orange LED String Lights
- Black tulle or netting
- Zip ties
Instructions:
- Wrap purple LED lights around each column from bottom to top
- Add orange lights in a second layer, creating a two-tone effect
- Drape black tulle or netting over the columns for texture
- Secure everything with zip ties at top and bottom
- The lights glow through the fabric, creating a mysterious, dimensional effect
Essential Tips for All DIY Halloween Decorations
Power Management: Calculate your electrical load before plugging everything in. LED lights use 90% less energy than incandescent bulbs, so you can run significantly more strands on a single circuit. Most outdoor outlets can handle 1,500-1,800 watts safely.
Weather Protection: Even though LED string lights are weatherproof, protect your connections. Use weatherproof connection protectors or wrap plug connections in electrical tape and place them off the ground.
Timer Strategy: Use an outdoor timer to automate your display. Set lights to turn on at dusk and off at midnight (or whenever trick-or-treating ends in your area). This saves energy and ensures your display runs consistently.
Color Psychology: Different colors create different moods. Orange and purple are playful and family-friendly. Red and green create a more sinister atmosphere. Blue and white feel ghostly and ethereal. Mix colors strategically based on your desired effect.
Layering Technique: The best displays use multiple layers of lighting—ground level, mid-level (bushes, props), and high level (rooflines, trees). This creates depth and visual interest from any viewing angle.
Halloween Lighting Safety Checklist
- Use only outdoor-rated LED lights and extension cords
- Keep all electrical connections off the ground and away from water
- Inspect all light strands before installation—replace any with damaged wiring
- Don't overload circuits (check your breaker capacity)
- Secure all lights and decorations against wind
- Keep pathways clear and well-lit for trick-or-treaters
- Use GFCI-protected outlets for all outdoor lighting
- Never run extension cords under rugs or through doorways where they can be damaged
Frequently Asked Questions
Can I really use Christmas lights for Halloween decorations?
Absolutely. LED string lights are versatile tools for any holiday. The key is choosing the right colors—orange, purple, green, red, and blue all work perfectly for Halloween themes. The weatherproof construction and energy efficiency make them ideal for outdoor Halloween displays.
What colors work best for Halloween lighting?
Orange and purple are the classic Halloween combination—they're recognizable and family-friendly. For a spookier effect, use red and green together. Blue and cool white create a ghostly, ethereal atmosphere. You can mix colors or stick with a single color scheme depending on your desired mood.
Do I need special clips or hardware for outdoor Halloween displays?
Yes, using proper light clips and installation accessories makes installation easier and protects your lights. Different surfaces require different clips—shingle clips for roofs, gutter clips for gutters, and all-purpose clips for various surfaces. This prevents damage to both your lights and your property.
How early should I set up my Halloween lights?
Most people start installing Halloween decorations in late September or early October. Setting up 2-3 weeks before Halloween gives you time to test everything, make adjustments, and enjoy your display for the full season. Plus, you'll beat the rush of last-minute decorators.
Can I leave my Halloween lights up through Thanksgiving?
Sure, though you might want to adjust the colors. Orange lights work perfectly for fall and Thanksgiving themes. You can even transition gradually—remove the spooky props but keep the warm orange and amber lighting through November.
What's the difference between LED and incandescent lights for Halloween?
LED lights are superior in every way. They use 90% less electricity, last up to 100,000 hours, stay cool to the touch (important when stuffed inside props), and are much more durable. They're also brighter and more vibrant, which makes your Halloween colors pop at night.
How do I store my Halloween lights after the season?
Wrap each strand around a piece of cardboard or a cord reel to prevent tangling. Store in a dry location away from extreme temperatures. Label each strand by color and project so next year's setup is quick and easy. Proper storage extends the life of your lights significantly.
Can I connect multiple light strands together?
Yes, but check the manufacturer's specifications. Most LED strands can connect 3-5 strands end-to-end safely. Exceeding this can overload the wiring. For larger displays, use multiple outlets or power distribution accessories.
What if it rains on Halloween night?
Quality outdoor LED lights are designed to handle rain, snow, and moisture. Just ensure all electrical connections are protected with weatherproof covers or placed under eaves. Your display will keep running through typical weather conditions.
About The Christmas Light Emporium
At The Christmas Light Emporium, we believe lighting creates joy, memories, and connections in communities—not just during December, but year-round. For over a decade, we've been helping homeowners create spectacular displays with the world's largest selection of unique LED color palettes and exclusive brands.
Our customers choose us because we offer industry-leading warranties, expert-tested products, and superior customer service. With over 70,000 happy customers and a 4.9 average rating, we've built our reputation on quality and reliability. Every product is backed by our Reindeer Proof™ warranty, and we offer same-day shipping during peak seasons.
Whether you're decorating for Halloween, Christmas, Fourth of July, or any celebration, we have the lights and accessories you need. Our team tests every product at the factory level before it ships to you, ensuring you receive only the highest quality lighting solutions.
Ready to create your best Halloween display yet? Browse our full collection of orange, purple, green, and red LED lights, plus all the installation accessories you need to bring these DIY Halloween decorations to life.
Questions about your Halloween lighting project? Contact our team at 1-888-444-XMAS or email support@thechristmaslightemporium.com. We're here to help you create displays that spread joy and make memories.